Luxury Golden Shimmer Chocolate Mousse
- Time: 15 min active + 2 hours chilling = Total 2 hours 25 mins
- Flavor/Texture Hook: Shimmery, glossy, and velvety
- Perfect for: High impact dinner parties or luxury gifting
- Decoding the Perfect Chocolate Mousse
- Fixing Grainy Texture Issues
- Precision Timing and Specs
- The Ingredient Deep Dive
- Tools for Maximum Volume
- Step by Step Execution
- Saving Your Dessert Batch
- Troubleshooting Common Issues
- Customizing Your Mousse Base
- Adjusting the Batch Size
- Debunking Mousse Myths
- Keeping it Fresh
- Plating for Visual Impact
- Recipe FAQs
- 📝 Recipe Card
I remember the first time I tried to hack a professional mousse at home. I was in a rush and dumped boiling hot chocolate directly into ice cold whipped cream. The result was a disaster - a pebbly, grainy mess that looked more like chocolate sand than a dessert. It was a total failure in temperature management.
The issue wasn't the ingredients, but the thermal shock. When hot fat hits cold liquid too quickly, it seizes and clumps, destroying that smooth mouthfeel we all want. I spent way too much time trying to fix it with a blender, but you can't "un seize" a mousse once the aeration is gone.
This version is the fix. We're using a precision based approach to ensure the temperatures align, creating a Golden Shimmer Chocolate Mousse that stays stable and smooth. No rubbery textures, no grainy clumps, just pure, airy luxury.
Decoding the Perfect Chocolate Mousse
Most people treat this as a "throw it together" dessert, but it's actually a study in aeration. If you want that professional feel, you have to treat the fat and the air as two separate components that need to be merged without fighting.
The goal here is to suspend tiny air bubbles within a matrix of cocoa butter and cream. If you fold too aggressively, you pop the bubbles. If you fold too gently, you get white streaks. It's all about the window of timing.
To get the best results, we focus on the temperature of the chocolate base. It needs to be cool enough not to melt the whipped cream, but warm enough to remain fluid for folding. This is the "sweet spot" that separates a mediocre bowl of chocolate cream from a true Chocolate Mousse.
Fixing Grainy Texture Issues
The secret isn't in the brand of chocolate, but in how you handle the emulsion. Most recipes fail because they ignore the temperature clash between the melted chocolate and the chilled cream.
- Thermal Equilibrium
- Matching the chocolate base to room temperature prevents the fat from seizing upon contact with cold cream.
- Air Bubble Integrity
- Using a figure eight folding motion preserves the macro bubbles created during whipping.
- Fat Stabilization
- The butter adds a secondary layer of stability, ensuring the mousse doesn't collapse over time.
- Sugar Particle Dissolution
- Powdered sugar dissolves instantly in cream, preventing a gritty texture.
| Method | Time | Texture | Best For |
|---|---|---|---|
| Stovetop (Double Boiler) | 15 mins | Ultra smooth | Precision control |
| Microwave (Bursts) | 5 mins | Consistent | Speed and convenience |
When you're deciding how to melt your chocolate, the stovetop is safer for beginners because you can't accidentally scorch the cocoa solids. However, if you're comfortable with 20 second bursts, the microwave is a total time saver for this Chocolate Mousse.
Precision Timing and Specs
To get this right, you need to hit specific numeric targets. This isn't a "pinch of this" kind of recipe - it's a ratio game.
- 1. Chocolate Temp
- The base should be roughly 85-90°F (29-32°C) before the first dollop of cream goes in.
- 2. Whip Level
- Stop beating the cream the second you see soft peaks - if it looks like frosting, you've gone too far.
- 3. Chill Window
- Exactly 2 hours. Any less and the center stays soft; any more and it might lose some of its airy lift.
Decision Shortcut:
- If you want a denser, truffle like feel, use 70% cacao chocolate.
- If you want a lighter, sweeter result, use 50% cacao.
- If you want a more metallic glow, double the gold luster dust.
The Ingredient Deep Dive
Choosing the right components is where the chemistry begins. We aren't just looking for "chocolate," we're looking for specific fat percentages.
| Ingredient | Science Role | Pro Secret |
|---|---|---|
| Dark Chocolate (60%) | Structure/Fat | Finely chop to ensure even melting |
| Heavy Cream | Aeration/Volume | Must be chilled to 40°F for maximum lift |
| Gold Luster Dust | Visual Finish | Sift it to avoid metallic clumps |
| Unsalted Butter | Mouthfeel | Room temp for instant emulsification |
Component Analysis
- 6 oz (170g) Dark chocolate (60% cacao), finely chopped Why this? Balance of cocoa butter for stability and sugar for taste
- 2 tbsp (28g) Unsalted butter, room temperature Why this? Adds a velvety sheen and prevents seizing
- 1/2 tsp (2g) Edible gold luster dust (food grade) Why this? Creates a high end visual shimmer
- 1 pinch (1g) Sea salt Why this? Cuts through the fat to highlight cocoa notes
- 1 1/2 cups (360ml) Heavy whipping cream, chilled Why this? High fat content (36%+) is required for peaks
- 3 tbsp (35g) Powdered sugar Why this? Finer grain than granulated for smooth aeration
- 1 tsp (5ml) Pure vanilla extract Why this? Rounds out the bitterness of the dark chocolate
For those looking for a different type of treat, this Shimmer Chocolate Mousse is far more airy than my Classic Blondies recipe, which is all about that dense, chewy texture.
Tools for Maximum Volume
You don't need a professional kitchen, but a few specific tools make the decoding process easier. A rubber spatula is non negotiable here. If you use a metal spoon, you'll likely deflate the air bubbles you worked so hard to create.
I recommend a chilled metal bowl for whipping the cream. If the bowl is warm, the fat in the cream starts to melt as you beat it, which means you'll never get those stable soft peaks. If you don't have a chilled bowl, pop it in the freezer for 10 mins before starting.
For the chocolate, a double boiler is the gold standard. If you're using the microwave, use a glass bowl - plastic can hold onto heat unevenly and create hot spots that burn the chocolate.
Step by step Execution
Let's get into the actual build. Remember, the goal is a Shimmer Chocolate Mousse that looks like it came from a luxury boutique.
- Melt the chocolate and butter. Use a double boiler or microwave in 20 second bursts. Stir until the mixture is smooth and glossy. Note: Avoid letting water touch the chocolate, or it will seize.
- Sift in gold luster dust and salt. Whisk vigorously until the chocolate takes on a metallic, shimmery glow. Let it cool to room temperature.
- Prepare the cream. In a chilled bowl, combine the heavy cream, powdered sugar, and vanilla. Beat on medium high speed until soft peaks form. Stop when the cream holds its shape but the tip curls over.
- Lighten the base. Gently dollop one third of the whipped cream into the gold chocolate base and stir quickly. Note: This "sacrificial" scoop makes the chocolate lighter so the rest of the cream doesn't deflate.
- The final fold. Add the remaining cream. Use a rubber spatula to fold gently in a figure eight motion. Stop immediately when no white streaks remain to preserve the air bubbles.
- Portion the mousse. Divide the mixture into 4 glass ramekins or coupes.
- The set. Chill for 2 hours before serving. Wait until the mousse feels firm to a light touch.
Chef's Tip: For an even more intense chocolate hit, add a teaspoon of instant espresso powder to the melting chocolate. It doesn't make it taste like coffee; it just makes the chocolate taste "darker."
Saving Your Dessert Batch
Even with precision, things can go sideways. The key is knowing how to pivot before the dessert is ruined.
Troubleshooting Common Issues
| Issue | Solution |
|---|---|
| Why Your Mousse Seized | If the chocolate becomes a hard, grainy clump while melting, it's usually because a drop of water got in or it overheated. |
| Why Your Mousse is Runny | This usually happens if the chocolate was too hot when the cream was added, or if the cream wasn't whipped to soft peaks. If it's still liquid after 2 hours, it's likely an aeration failure. |
| Why Gold Dust is Clumping | If you see little gold beads instead of a shimmer, you didn't sift the dust. You can't really fix this once it's folded in, so always sift. |
Common Mistakes Checklist:
- ✓ Using room temp cream instead of chilled.
- ✓ Folding until "perfectly smooth" (this kills the air).
- ✓ Using a whisk for the final fold instead of a spatula.
- ✓ Skipping the "sacrificial" first scoop of cream.
Customizing Your Mousse Base
Depending on your diet, you can swap a few things without ruining the chemistry of the Chocolate Mousse.
- dairy-free Luxury: Use a chilled coconut cream (the thick part at the top of the can) and vegan butter. Note: This adds a slight coconut flavor.
- Egg Free/Vegetarian: This recipe is already egg free, making it a great alternative to traditional French mousse.
- Low Sugar Twist: Swap powdered sugar for a powdered monk fruit sweetener. It maintains the volume without the glycemic spike.
- Ultra Dark Intensity: Use 85% cacao. Note: You may need an extra tablespoon of powdered sugar to balance the bitterness.
If you're looking for other high protein treats, you might enjoy my Protein Cookie Dough, though it's a much denser experience than this airy dessert.
Adjusting the Batch Size
When you need to change the yield, you can't just multiply everything blindly. The aeration process changes with volume.
Scaling Down (Half Batch): Use a smaller bowl for the cream. If you're using a stand mixer, be careful - it's easy to over whip a small amount of cream in seconds. Reduce the chilling time by about 20% since the smaller portions cool faster.
Scaling Up (Double or Triple): Do not triple the salt or vanilla - increase those by only 1.5x. Liquids should be reduced by about 10% to maintain the same thickness. Most importantly, work in batches for the folding process.
If the bowl is too full, you'll end up over mixing the bottom layer just to reach the top.
Debunking Mousse Myths
There are a lot of old school rules about this dish that just don't hold up to a bit of chemistry.
Myth: You need raw eggs for "authentic" mousse. Truth: While traditional French recipes use eggs, a cream based Chocolate Mousse is often more stable and has a cleaner chocolate flavor. It also removes the risk of undercooked eggs.
Myth: Higher cacao percentages always make it firmer. Truth: While cocoa butter provides structure, too much cacao can make the mousse brittle or "chalky" if not balanced with enough fat (butter/cream).
Keeping it Fresh
Storage is where most people mess up. This dessert is an emulsion of air and fat, so it's sensitive to temperature swings.
Fridge Guidelines: Keep in airtight containers for up to 3 days. If you leave them uncovered, the mousse will absorb "fridge smells" (like that leftover onion in the back) because of the high fat content.
Freezer Guidelines: You can freeze this for up to 1 month. However, the texture will change. When it thaws, the air bubbles may collapse, turning it into something more like a dense ganache.
Zero Waste Tip: If you have leftover chocolate or butter from the prep, melt them together with a splash of cream to make a quick drizzle for fruit or a dip for pretzels.
Plating for Visual Impact
Since this is a luxury dessert, the presentation should match. The gold shimmer is a great start, but you can push it further.
The Contrast Pair: Serve with a tart raspberry coulis or a few fresh blackberries. The acidity of the berries cuts through the richness of the Chocolate Mousse, preventing "palate fatigue."
The Texture Addition: Add a sprinkle of flaky sea salt or a few crushed hazelnuts on top. This adds a crunch that contrasts with the velvety interior.
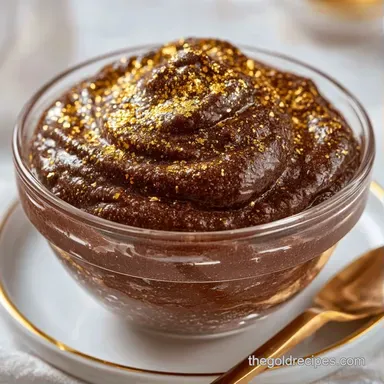
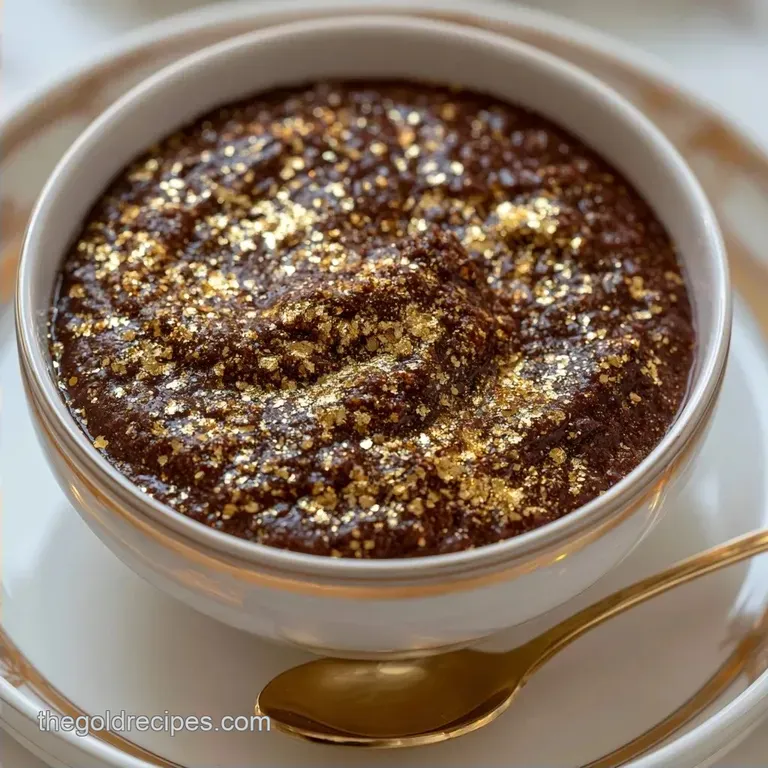
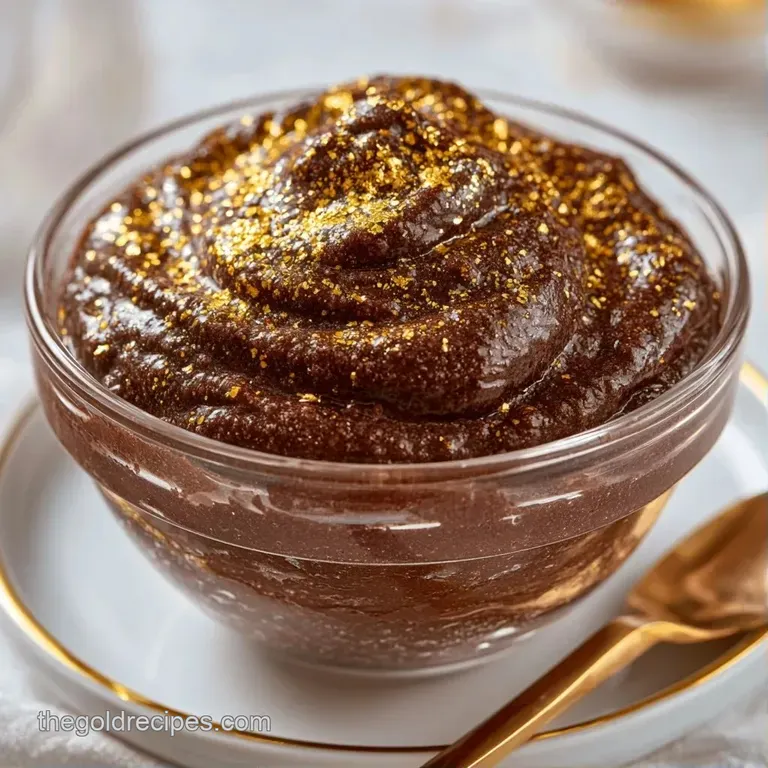
The Final Touch: For a truly high end look, use a piping bag to swirl the mousse into the glass instead of spooning it in. This creates more surface area for the gold luster to catch the light.
Recipe FAQs
Can diabetics eat this chocolate mousse?
No, this recipe is not diabetic friendly. It contains powdered sugar and dark chocolate which can spike blood glucose. For a higher protein alternative, try our chocolate protein ice cream.
What makes this chocolate mousse so fluffy?
The aeration from whipped heavy cream. Folding the cream into the chocolate base using a figure eight motion preserves the air bubbles created during whipping.
Do you store chocolate mousse in the fridge or freezer?
Store it in the fridge. Chill the ramekins for 2 hours to allow the mousse to set properly without freezing the cream.
Does the gold luster dust change the flavor of the mousse?
No, it is completely tasteless. Food grade luster dust is used exclusively to provide a metallic, shimmery visual effect.
Why did my chocolate mousse seize and become grainy?
Water entered the mixture or it overheated. Even a single drop of water during the melting process can cause the chocolate to clump and lose its gloss.
How to fix a runny chocolate mousse?
Chill the ramekins for a full 2 hours. If it remains liquid, the chocolate was likely too hot when combined with the cream or the cream wasn't whipped to soft peaks.
How to fold whipped cream into chocolate without losing air?
Use a rubber spatula in a figure eight motion. Stop mixing immediately once no white streaks remain to maintain the light, airy volume.
Golden Shimmer Chocolate Mousse