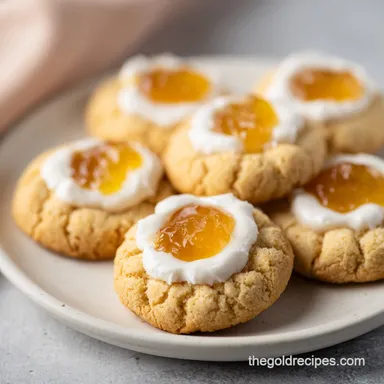
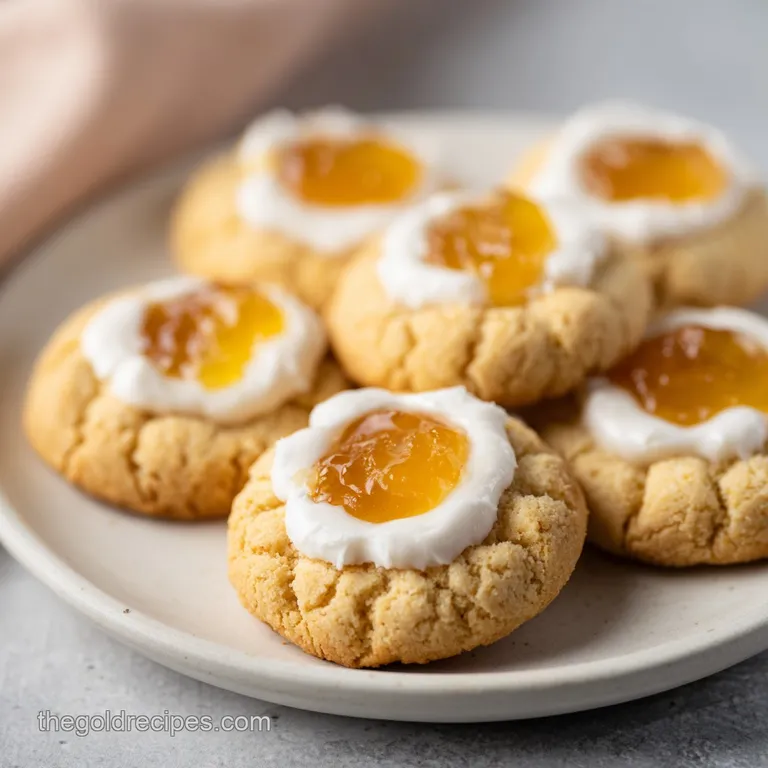
Quick Coconut Jam Thumbprint Cookies: Buttery and Crisp
- Time: 20 min active + 15 min bake = Total 55 mins
- Flavor/Texture Hook: Buttery, shatter crisp edges with a velvety jam center
- Perfect for: Tropical themed parties, afternoon tea, or a fast dessert craving
Quick Coconut Jam Thumbprint Cookies
The scent of toasted coconut hitting a hot oven is one of those smells that just stops you in your tracks. It's a warm, nutty aroma that immediately reminds me of the tropical tea cakes my aunt used to make during the holidays.
In her kitchen, these weren't just treats, they were a ritual, where the kids were tasked with pressing the "thumbprints" into the dough, usually resulting in some very uneven cookies, but plenty of laughter.
I've spent a lot of time decoding why some of those old school recipes worked while others just turned into flat, jammy puddles on the pan. The trick is all in how the fat and the coconut interact to create a wall that the jam can't penetrate.
These quick coconut jam thumbprint cookies are my hacked version of that tradition, streamlined for a modern kitchen but keeping that nostalgic, buttery soul.
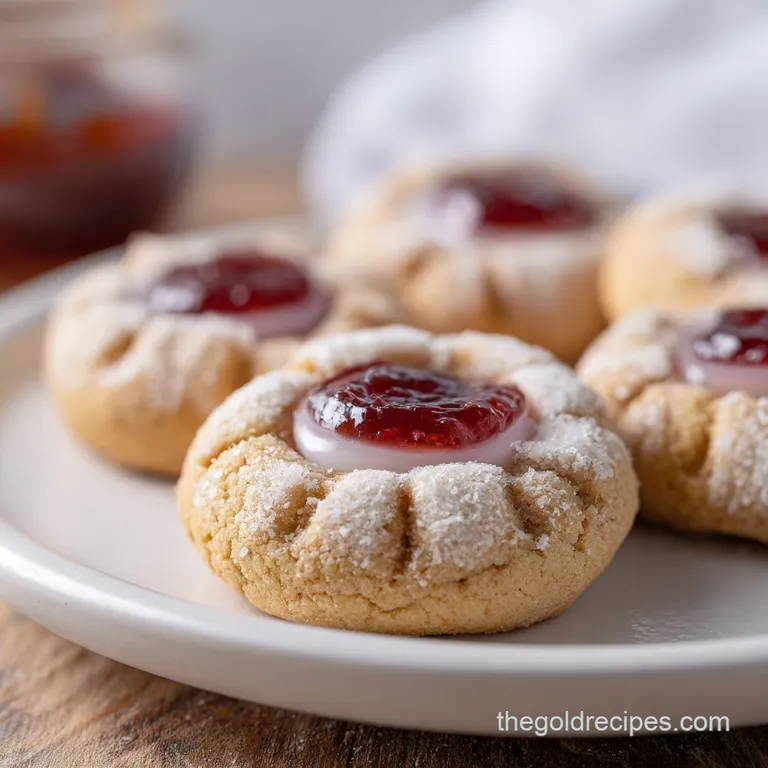
You can expect a cookie that has a slight crunch on the outside but remains tender in the center. The coconut adds a bit of chew and a layer of flavor that cuts through the sweetness of the preserve.
It's a straightforward process, but as we'll see, there are a few specific failure points we need to avoid to get that professional, clean look.
Why This Works
- Fat Barrier: The high butter content coats the flour particles, which prevents too much gluten from forming and keeps the cookie tender.
- Coconut Structure: Shredded coconut acts like tiny reinforcements in the dough, helping the cookie maintain its height during the bake.
- Sugar Stability: Using granulated sugar instead of brown sugar reduces the amount of moisture, preventing the cookies from spreading too thin.
- Jam Viscosity: The high sugar content in preserves causes the jam to thicken as it heats, creating a stable, gel like center.
| Method | Time | Texture | Best For |
|---|---|---|---|
| Oven Baked | 15 mins | Crisp edges, set center | Classic batches, gifting |
| Stovetop Fudge Style | 20 mins | Soft, chewy, dense | Fast cravings, no oven |
Component Analysis
| Ingredient | Science Role | Pro Secret |
|---|---|---|
| Unsalted Butter | Provides structure and richness | Use 65°F butter for a better cream |
| All Purpose Flour | Creates the crumb structure | Weigh it for consistency |
| Shredded Coconut | Adds chew and stability | Finely shredded blends better |
| Jam/Preserves | Adds acidity and sweetness | Use a thick preserve, not jelly |
Gathering Your Essentials
For the dough, you'll need 115 g of unsalted butter. Make sure it's softened but not oily, as this affects the aeration. You'll also need 65 g of granulated sugar. Why this? Keeps the cookie crisp and prevents excess spreading.
Next, grab 50 g of a large egg (about one medium egg) and 5 ml of vanilla extract. For the dry base, use 190 g of all purpose flour, 3 g of baking powder, and 1.5 g of salt. Why this? The salt balances the sugar and enhances the coconut flavor.
Finally, incorporate 45 g of sweetened shredded coconut, finely shredded. Why this? Fine shreds ensure the dough stays cohesive. For the filling, you'll need 80 g of apricot or raspberry jam. If you want a bit of extra flair, have 15 g of toasted coconut flakes ready for garnish. If you're looking for other butter heavy treats, my golden homemade biscuits use a similar fat to flour logic for that signature flake.
| Original Ingredient | Substitute | Why It Works |
|---|---|---|
| All Purpose Flour | Almond Flour | Same fat profile. Note: Results in a denser, grainier crumb |
| Raspberry Jam | Apricot Jam | Similar acidity. Note: Changes flavor to a milder, honey like taste |
| Shredded Coconut | Finely Chopped Nuts | Adds crunch and fat. Note: Loses the tropical aroma |
The quality of your jam really dictates the final result here. If the jam is too watery, it will soak into the cookie and make it soggy. Look for "preserves" rather than "jelly" because the fruit chunks help hold the structure together under high heat.
Equipment Needed
You don't need a fancy kitchen to pull this off, but a few tools make it easier. A stand mixer such as KitchenAid is great for the creaming stage, but a hand mixer works just as well. You'll also need a baking sheet and parchment paper.
Trust me, don't skip the parchment, or you'll be scrubbing burnt jam off your pan for an hour.
A small measuring spoon (about 1/2 teaspoon) is the secret weapon here. Using the rounded back of the spoon to make the indent is way more consistent than using your actual thumb, which tends to push the dough too far down.
Key Steps
- Cream the softened butter and sugar. Beat them together until the mixture is light, pale, and fluffy. Note: This incorporates air for a lighter texture.
- Beat in the egg and vanilla extract. Continue mixing until the batter is fully emulsified and no longer looks separated.
- Whisk flour, baking powder, and salt in a separate bowl. Gradually fold them into the wet ingredients using a spatula.
- Stir in the shredded coconut. Mix until the coconut is evenly distributed but do not overwork the dough.
- Preheat your oven to 350°F (180°C). Prepare your baking sheet with parchment paper.
- Scoop 1 tablespoon of dough. Roll it into a smooth ball between your palms.
- Place balls on the sheet 2 inches apart. Use the back of a small measuring spoon to press a deep cavity into the center.
- Spoon 1/2 teaspoon of jam into each cavity. Fill them carefully so the jam doesn't touch the edges.
- Bake for 12-15 minutes until the edges are barely golden.
- Cool on the pan for 5 minutes. Transfer to a wire rack to finish cooling.
Pro Tips & Pitfalls
Chef's Note: If your dough feels too sticky to roll, pop it in the fridge for 10 minutes. Cold butter makes the dough much easier to handle and prevents the cookies from flattening too much in the oven.
One mistake I once made was filling the jam centers right to the brim. When the jam heats up, it expands. If it touches the edge of the dough, it will bubble over and create a sticky, burnt ring around your cookie. Leave a tiny gap between the jam and the dough wall.
Another trick is to toast your garnish coconut in a dry pan for 2 minutes before adding it. This brings out a deep, nutty flavor that complements the jam. If you love these kinds of tropical flavors, you might also enjoy my mini pineapple upside down cakes for a similar vibe.
Avoiding Dough Cracks
If the dough cracks when you press the indent, it usually means the butter was too cold. Let the dough sit at room temperature for a few minutes, or gently warm the back of your spoon under hot water before pressing.
Fixing Runny Jam
If your jam is too thin, simmer it in a small saucepan for 5 minutes to reduce the water content. A thicker jam stays put and gives you that clean, "jewel like" look in the center.
Ensuring Even Browning
Rotate your baking sheet halfway through the 15 minute bake. Most ovens have hot spots, and rotating ensures every cookie gets that same light golden edge.
Troubleshooting
| Issue | Solution |
|---|---|
| Why Your Cookies Spread | If your cookies turned into flat discs, the butter was likely too soft or the oven wasn't hot enough. When butter is too warm, it melts faster than the flour can set, causing the dough to collapse. |
| Why Your Jam Bubbled Over | This happens when the jam is filled too high or has too much water. The water turns to steam, pushing the jam over the edges of the thumbprint. |
| Why The Base Is Tough | Over mixing the flour develops too much gluten. Once the flour goes in, fold it just until you don't see any white streaks, then stop. |
Common Mistakes Checklist
- ✓ Avoid over creaming the butter and sugar (don't go over 3 minutes).
- ✓ Ensure the jam is thick and not a runny jelly.
- ✓ Use a scale for the flour to avoid "packing" the measuring cup.
- ✓ Let the cookies cool on the pan for at least 5 minutes to set the base.
- ✓ Use a spoon for the indent, not your thumb, for uniform depth.
Adjusting Batch Sizes
If you're just making a small treat for yourself, you can halve the recipe easily. For a 1/2 batch, use half of every ingredient. Since you can't easily halve an egg, beat the 50 g egg in a bowl first and then measure out 25 g. Use a smaller baking sheet and reduce the bake time by about 2 minutes.
For those making a double or triple batch for a party, don't just multiply everything and throw it in one bowl. Work in batches to ensure the butter and sugar are creamed properly.
If you're baking multiple sheets at once, lower the oven temperature to 325°F (160°C) and extend the bake time by 3-5 minutes. This prevents the bottom sheet from burning while the top one cooks.
| Goal | Change | Impact |
|---|---|---|
| Half Batch | Use 25g egg | Smaller yield, check doneness early |
| Double Batch | Lower temp 25°F | Even bake across multiple racks |
| Triple Batch | Mix in two stages | Better aeration and emulsification |
Remember that crowding the oven can lead to uneven heat distribution. Give your sheets a few inches of space to allow the hot air to circulate around the cookies.
Cookie Baking Beliefs
Some people believe that you must chill the dough for 24 hours to get the best flavor. While chilling helps with spreading, for this specific coconut recipe, a 15 minute chill is plenty. The coconut already provides a lot of stability.
Another common myth is that using a "thumb" is the only way to make thumbprint cookies. In reality, as we've seen, a measuring spoon provides a much more consistent depth, which prevents the jam from overflowing and creates a more professional appearance.
Storage Guidelines
Store these cookies in an airtight container at room temperature for up to 5 days. Because of the jam, they can attract moisture from the air, so make sure the container is sealed tight. If you live in a very humid climate, keep them in the fridge to prevent the jam from becoming sticky.
For long term storage, you can freeze the baked cookies for up to 3 months. Wrap them individually in parchment paper and place them in a freezer bag. When you're ready to eat them, let them thaw at room temperature for 30 minutes, or pop them in a 300°F (150°C) oven for 3 minutes to refresh the crispness.
To avoid waste, if you have leftover dough, roll it into small balls and bake them without jam as simple coconut butter cookies. If you have extra jam, stir it into some Greek yogurt or use it as a glaze for roasted carrots.
Serving and Enjoyment
These cookies are best served at room temperature. For a a more decadent finish, drizzle a tiny bit of melted white chocolate over the top and sprinkle with those toasted coconut flakes. The white chocolate echoes the creaminess of the coconut while adding a bit of a snap.
If you're putting together a tropical dessert platter, pair these with fresh mango slices and a bowl of whipped cream. The acidity of the mango cuts through the buttery richness of the cookie. They also go brilliantly with a cup of strong black coffee or a cold glass of coconut milk.
For a tea time setup, arrange them on a tiered stand with some savory finger sandwiches. The sweetness of the jam makes them a great bridge between salty snacks and the end of the meal.
Just make sure to serve them on a platter that allows them to breathe, so the bottoms stay crisp and don't get soft from the residual heat.
Recipe FAQs
Can I store these at room temperature?
Yes, for up to 5 days. Keep them in an airtight container to prevent the jam from absorbing moisture. They are a great sweet addition to a brunch spread alongside a savory breakfast casserole.
Why are my cookies tough?
You likely overmixed the flour. This develops too much gluten; fold the dry ingredients into the wet ones just until combined.
How to prevent the jam from bubbling over?
Spoon only ½ teaspoon of jam into the cavity. Overfilling or using a jam with too much water causes steam to push the preserves over the edges.
How to create the thumbprint cavity?
Use the back of a small measuring spoon. Press firmly into the center of each rolled dough ball to create a deep enough space for the jam.
Why did my cookies spread into flat discs?
The butter was likely too soft or the oven was too cold. When butter is too warm, it melts before the flour sets at 350°F, causing the dough to collapse.
Is it true that any temperature of butter works for the dough?
No, this is a common misconception. Butter must be softened, not melted, to maintain the structure needed for a thumbprint shape.
Can I freeze these cookies?
Yes, for up to 3 months. Wrap them individually in parchment paper and place them in a freezer bag to maintain freshness.
Coconut Jam Thumbprint Cookies