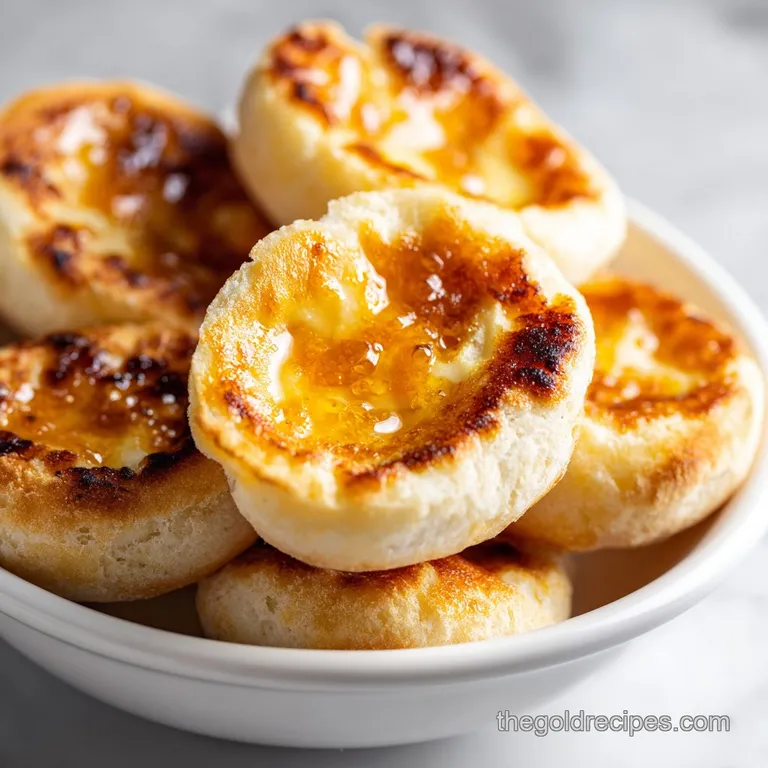
Buttery English Muffins: Fluffy and Pan-Seared
- Time:20 minutes active + 1 hour 35 mins rising = Total 2 hours 35 mins
- Flavor/Texture Hook: Mahogany crust with a velvety, buttery interior
- Perfect for: Slow weekend breakfasts or meal prep freezing
Buttery English Muffins
The sound of a cast iron skillet hitting that sweet spot of heat is a specific kind of music, followed by the aggressive sizzle as the dough hits the butter. I used to think that those legendary "nooks and crannies" were the result of some industrial steam injection oven that only commercial bakeries owned.
I spent months trying to mimic that texture in a standard oven, only to end up with something that looked like a miniature loaf of sourdough.
Forget the idea that you need professional equipment to get a professional result. The secret isn't in the oven, it's in the temperature gradient between the pan and the dough. By decoding how the heat moves through the muffin from the bottom up, we can force the air bubbles to expand and lock in place, creating the structure we're after.
These Buttery English Muffins aren't just a copycat; they're a refinement. We're using a specific fat to flour ratio that ensures the crumb stays tender even after they've been toasted twice. You'll get a crust that's slightly crisp from the cornmeal and an interior that's light, airy, and rich.
Why These Beats store-bought
The biggest lie in the grocery aisle is that "traditional" muffins are made with simple ingredients. Most are loaded with preservatives to keep them soft for weeks, which actually kills the structural integrity needed for those air pockets.
When we make these from scratch, we control the fermentation, which is where the real flavor lives.
The Nook Logic: Heat creates steam. When the bottom of the muffin hits the hot skillet, the moisture in the dough turns to steam and pushes upward. This creates a vertical expansion that stretches the gluten, leaving those gaps behind as the bread sets.
The Butter Influence: Most recipes use oil or nothing at all. By using melted butter, we interfere with the gluten strands just enough to stop the bread from becoming too chewy, resulting in a velvety texture.
The Cornmeal Barrier: Cornmeal isn't just for looks. It acts as tiny ball bearings between the dough and the pan, preventing the muffin from sticking and adding a subtle, toasted nuttiness to the crust.
The Double Rise: The first rise builds the flavor and strength, while the second proof ensures the muffins are light enough to expand rapidly when they hit the heat.
| Method | Time | Texture | Best For |
|---|---|---|---|
| Stovetop | 30 mins | Crispy crust, airy center | Maximum nooks and crannies |
| Oven | 15 mins | Uniform bake, softer crust | Bulk batches, less monitoring |
| Air Fryer | 12 mins | Very crisp, denser crumb | Small portions, quick prep |
I've found that the stovetop method is the only way to get that authentic, mahogany colored bottom. If you're looking for something similarly buttery but with a different structure, you might like my Golden Homemade Biscuits, though those rely on cold fat rather than melted butter.
The Technical Breakdown
Understanding the role of each component allows you to tweak the recipe without breaking the chemistry. It's all about the balance of hydration and structure.
| Ingredient | Science Role | Pro Secret |
|---|---|---|
| All Purpose Flour | Structural Framework | Measure by weight (375g) to avoid dry dough |
| Active Dry Yeast | Carbon Dioxide Production | Use warm milk, not hot, to avoid killing yeast |
| Melted Butter | Gluten Shortening | Cool slightly before adding to prevent "frying" yeast |
| Cornmeal | Thermal Buffer | Use yellow cornmeal for a more vivid gold crust |
The Essential Tool Kit
You don't need a laboratory, but a few specific tools make the process much smoother. I highly recommend a heavy bottomed cast iron skillet because it holds heat far more consistently than thin aluminum pans.
For the shaping, a 3 inch circular cutter is standard, but a wide mouth drinking glass works just as well. Just make sure the edges are sharp so you don't "pinch" the dough, which can seal the edges and prevent the muffins from rising vertically.
A digital kitchen scale is your best friend here. Flour is notorious for compressing in a measuring cup, and adding an extra 20-30 grams of flour can turn a velvety muffin into a dense brick. If you have one, stick to the gram measurements provided in the schema.
Step by step Execution
Right then, let's get into the actual build. This is where the precision pays off.
Activating the Base
Whisk the warm milk, sugar, and yeast in a large mixing bowl. Let it sit for 5-10 minutes until a thick, frothy foam forms on the surface. This is your confirmation that the yeast is alive and ready to work. If it doesn't foam, your milk was likely too hot or your yeast is expired.
Integrating the Flour and Butter
Stir in the melted butter, then gradually add the flour and salt. Mix until a soft, slightly tacky dough forms. Note: "Tacky" is different from "sticky." The dough should cling slightly to your finger but not leave a residue.
The First Rise
Turn the dough onto a floured surface and knead for 3-5 minutes until smooth and elastic. Place in a greased bowl, cover, and let rise in a warm spot for 1 hour until it has doubled in size. This is when the yeast is decoding the sugars and building the gas bubbles.
Shaping the Rounds
Punch down the risen dough to release excess gas. Roll it out to a thickness of about 1 inch (2.5cm). Use your cutter to stamp out 12 rounds. Note: Press straight down; do not twist the cutter, as twisting seals the dough edges.
The Cornmeal Dusting
Dust the top and bottom of each round generously with cornmeal. This isn't just for flavor; it prevents the dough from fusing to the parchment or the pan.
The Final Proof
Place the rounds on a parchment lined tray, cover loosely, and let them proof for another 30-45 minutes until they look puffed and light. This second rise is critical for the internal air pockets.
The over Low heat Sear
Heat your skillet over medium low heat. Carefully place the muffins in the pan, ensuring they are not crowded. Note: If the pan is too hot, the outside will burn before the inside cooks.
Achieving Mahogany
Cook for 5-7 minutes per side until a deep, mahogany colored crust forms. The muffins should sound hollow when tapped on the top, indicating the center is fully set.
Fixing Common Texture Issues
Even with a plan, things can go sideways. Usually, it comes down to temperature or hydration.
Troubleshooting Common Issues
| Issue | Solution |
|---|---|
| Why Your Muffins Are Flat | If your muffins didn't rise, it's usually a yeast issue. Either the milk was too hot (killing the yeast) or too cold (slowing it down). According to King Arthur Baking for a sweet dessert contrast. |
Freshness and Storage Rules
Homemade bread doesn't have the stabilizers of store-bought versions, so you have to be smarter about how you keep them.
Fridge Storage: Store in an airtight container for up to 5 days. Always re toast them to bring back the crispness of the crust.
Freezing Method: These are perfect for meal prep. Freeze them in a single layer on a tray first, then move them to a freezer bag. This prevents them from freezing into one giant block. They'll stay fresh for up to 3 months.
Reheating: From frozen, you can pop them directly into the toaster. No need to thaw.
Zero Waste Tip: Don't throw away the leftover cornmeal from your tray. Collect it and use it as a coating for fried chicken or pan seared fish to add a similar crusty texture.
Serving and Pairing Ideas
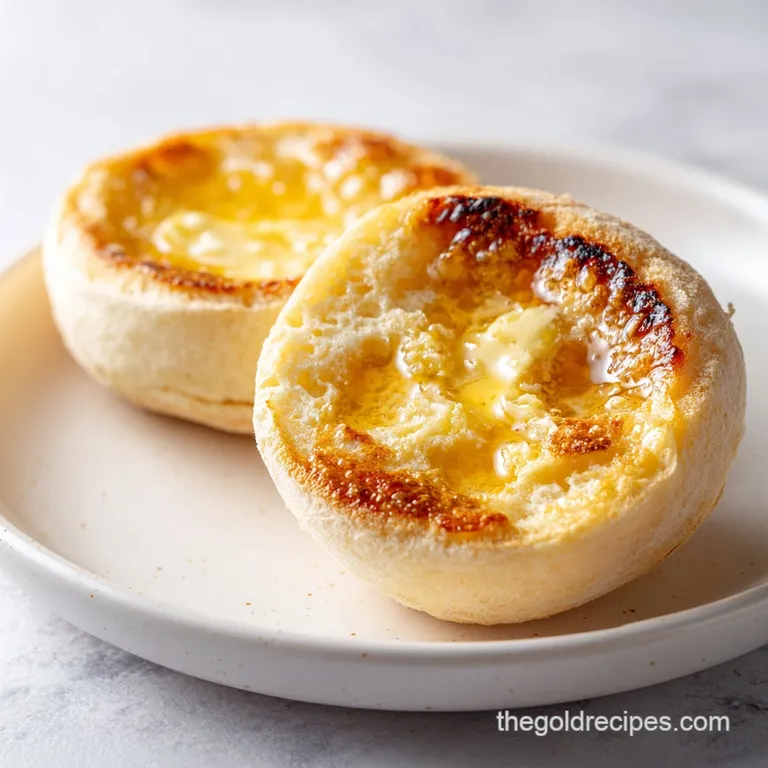
The best way to eat Buttery English Muffins is to split them with a fork, not a knife. This preserves the nooks and crannies, allowing butter and jam to pool in the gaps rather than being smashed flat.
For a powerhouse breakfast, top them with a poached egg and smashed avocado. The richness of the avocado fills the air pockets, creating a velvety mouthfeel. Alternatively, a classic combination of thick cut Canadian bacon and a slice of sharp cheddar creates a salty, savory balance.
If you're feeling fancy, try a "breakfast slider" by stuffing the muffins with a small sausage patty and a drizzle of maple syrup. The mahogany crust of the muffin holds up well to the weight of the toppings without getting soggy.
Decision Shortcut:
- If you want maximum crunch, use a cast iron skillet.
- If you're short on time, use the oven method for bulk baking.
- If you want a softer bite, slightly increase the butter by 1 tablespoon.
Recipe FAQs
Is butter good on an English muffin?
Yes, it is the traditional pairing. The melted butter seeps into the air pockets and enhances the toasted cornmeal flavor. This pairs perfectly with a protein rich burrito for a hearty breakfast.
Can diabetics have muffins?
Moderation is necessary. Because these contain granulated sugar and all-purpose flour, they can cause blood sugar spikes.
How to store leftover English muffins?
Keep them in an airtight container at room temperature for up to two days. For longer storage, freeze them in a sealed bag.
Why are my English muffins flat?
The yeast likely failed to activate. This occurs if the milk was too hot, which kills the yeast, or too cold, which prevents the initial foam from forming.
Is it true I must use a cast iron skillet for the crust?
No, this is a common misconception. A non-stick griddle is an effective alternative for achieving a deep mahogany crust.
How to get the perfect "nooks and crannies" texture?
Limit your kneading to 3 5 minutes. Overworking the dough removes the air pockets necessary for that signature open crumb.
Can I use cold milk instead of warm milk?
No, warm milk is required. Yeast needs specific warmth to activate and create the frothy foam needed for the muffins to rise.
Buttery English Muffins

