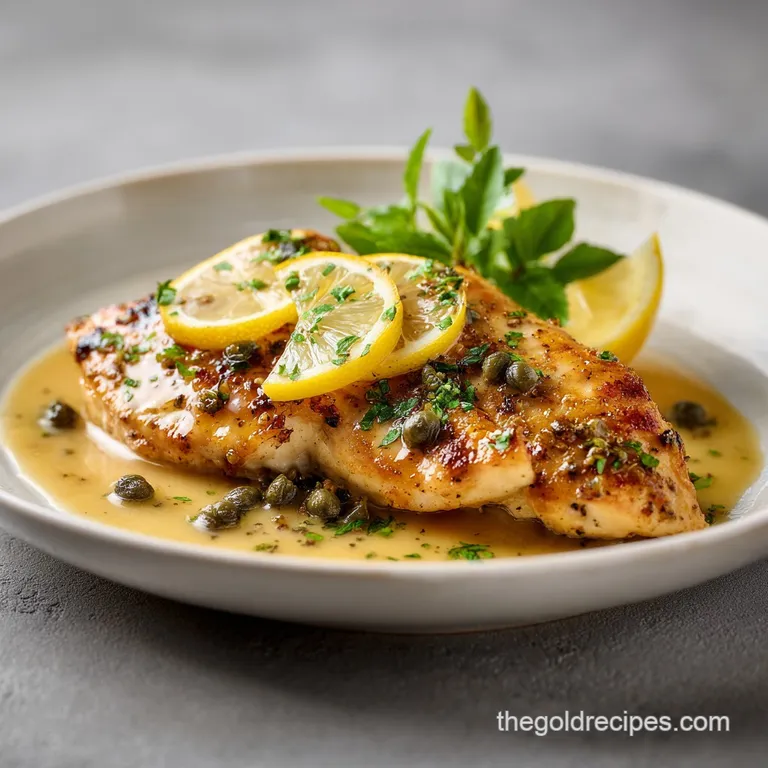
Chicken Piccata: Crispy and Tangy
- Time: Active 15 minutes, Passive 15 minutes, Total 30 minutes
- Flavor/Texture Hook: Tangy, buttery sauce with a shatter crisp chicken exterior
- Perfect for: Busy weeknight family dinners or a quick budget-friendly date night
Creating the Best Chicken Piccata
There is nothing quite as frustrating as biting into a piece of chicken that looks golden but feels like a wet sponge. I remember the first time I tried to make this for my family - I used way too much oil at a low temperature, and the breading basically slid off the meat into a pool of lemon juice.
It was a greasy mess, and we ended up ordering pizza. But after a few trials, I realized the secret isn't in fancy equipment, it's all about the temperature of your pan and the timing of your butter.
When you get it right, the kitchen fills with this bright, citrusy aroma that cuts right through the richness of the butter. You'll hear that aggressive sizzle when the floured chicken hits the hot oil, and you'll see it transform into a deep mahogany brown.
It is a hearty, family focused meal that looks incredibly expensive but actually uses very basic pantry staples. We make this at least twice a month because it's one of those rare dishes where everyone at the table actually clears their plate without complaining.
The magic happens in that final minute when you whisk in the cold butter. It's the difference between a watery broth and a velvety, glossy sauce that coats the back of your spoon. This recipe is designed for busy cooks who need a win. No complicated steps, just reliable techniques that work every single time.
Trust me, once you master the "pan sauce shimmy," you'll never want to buy the pre made stuff again.
Understanding Sauce Texture
To get that restaurant style finish, you have to understand a little bit about what's happening in the pan. It's not magic, it's just a few simple reactions that turn basic liquid into gold.
- Surface Area: Pounding the chicken to 1/4 inch (about 6mm) thickness ensures the meat cooks at the exact same rate as the flour crust browns.
- Starch Suspension: The light coating of all purpose flour on the chicken doesn't just add crunch, it actually sheds a tiny bit of starch into the wine and stock, which acts as a natural thickener for the sauce.
- Cold Fat Integration: Adding chilled, cubed butter at the very end prevents the fats from separating, creating a smooth, stable emulsion instead of a greasy puddle.
- Deglazing Action: The white wine acts as a solvent, lifting the flavorful browned bits (the fond) off the bottom of the stainless steel pan and incorporating them into the liquid.
| Thickness | Internal Temp | Rest Time | Visual Cue |
|---|---|---|---|
| 6 mm (1/4 inch) | 74°C (165°F) | 3 mins | Golden brown, firm to touch |
| 12 mm (1/2 inch) | 74°C (165°F) | 5 mins | Juices run clear when pierced |
| 20 mm (3/4 inch) | 74°C (165°F) | 5 mins | No pink in the thickest part |
This table helps you decide how long to cook your chicken based on how thin you were able to pound it. For a busy weeknight, I always aim for the 6 mm mark because it cooks so incredibly fast and gives you the best ratio of crispy coating to juicy meat.
| Component Analysis | Science Role | Pro Secret |
|---|---|---|
| Dry White Wine | Acidity & Solvent | Use a crisp wine like Pinot Grigio to cut through the heavy butter. |
| Non pareil Capers | Brine & Umami | Rinse them first! The brine can be overpowering and make the sauce too salty. |
| Chilled Butter | Emulsifier | Keep it in the fridge until the very last second to ensure a velvety finish. |
Official Recipe Specs
This recipe is built to serve 4 people, making it a perfect hearty meal for a standard family size. We’ve kept the ingredients budget friendly by using pantry staples and focusing on techniques that make humble chicken breasts taste like a gourmet treat.
- Prep Time:15 minutes
- Cook Time:15 minutes
- Total Time:30 minutes
- Yield: 4 servings
I often find that people overthink the wine choice. Honestly, any dry white wine you'd be happy to drink with dinner works perfectly. If you are cooking for kids and want to avoid the alcohol, you can use extra chicken stock with a splash of white wine vinegar, though the flavor won't be quite as deep.
The goal here is balance - the tart lemon, salty capers, and rich butter should all play together without one dominating the others.
Essential Shopping List
Here is everything you need to grab from the store. I've included some easy swaps in case your local market is out of something or if you're trying to save a few extra dollars on your grocery bill.
- Chicken: 2 large boneless, skinless chicken breasts (approx. 450g / 1 lb). Why this? Lean protein that takes on the sauce flavors beautifully. (Swap: Pork tenderloin cutlets work surprisingly well).
- Flour: 1/2 cup (65g) all purpose flour. Why this? Creates the essential crispy barrier. (Swap: Cornstarch for a gluten-free option, but use half the amount).
- Seasoning: 1 tsp kosher salt and 1/2 tsp freshly cracked black pepper.
- Fats: 2 tbsp extra virgin olive oil and 5 tbsp unsalted butter, divided (2 tbsp for searing, 3 tbsp chilled for the sauce).
- Liquids: 1/2 cup (120ml) dry white wine and 1/2 cup (120ml) low sodium chicken stock. Why this? The wine adds brightness while the stock adds body. (Swap: All stock plus 1 tbsp vinegar for an alcohol free version).
- Aromatics: 1/4 cup (60ml) fresh lemon juice and 1/4 cup non pareil capers.
- Herbs: 1/4 cup fresh Italian parsley, chopped.
| Original Ingredient | Substitute | Why It Works |
|---|---|---|
| Dry White Wine | Chicken Stock + Lemon | Maintains acidity without the alcohol content. |
| Unsalted Butter | Ghee | Higher smoke point for searing, but still adds that rich, nutty flavor. |
| Capers | Chopped Green Olives | Provides the same salty, brined punch if capers are unavailable. |
When you're picking out your lemon, give it a gentle squeeze. You want one that feels slightly soft and heavy for its size - that's a sign it's full of juice. Hard lemons are usually all pith and very little liquid, which can make your sauce taste bitter instead of bright.
Kitchen Tools Needed
The best part about this recipe is that it doesn't require a mountain of dishes. You want to focus on a few key items that will help you get that perfect sear and a smooth sauce.
- Large Skillet: Stainless steel is best here because it helps create the "fond" (the brown bits) which are essential for the sauce. Avoid non stick if possible, as it doesn't brown the meat as effectively.
- Meat Mallet: Necessary for getting the chicken to a uniform thickness. If you don't have one, a heavy rolling pin or even the bottom of a heavy saucepan works in a pinch.
- Whisk: To incorporate the cold butter into the sauce at the end.
- Shallow Bowls: For dredging the chicken.
If you find yourself making a lot of these creamy skillet meal types of dishes, investing in a good 12 inch stainless steel pan is a game changer. It distributes heat much more evenly than thinner pans, which prevents those pesky hot spots that can burn your butter before the chicken is even cooked through.
step-by-step Method

- Butterfly the chicken breasts by slicing them in half horizontally to create four thinner cutlets. Place under plastic wrap and pound with a meat mallet to a uniform 6 mm (1/4 inch) thickness. Note: This ensures the chicken cooks in minutes without drying out.
- In a shallow bowl, whisk together the flour, salt, and pepper. Dredge each chicken cutlet in the seasoned flour, shaking off any excess. The chicken should have a light, dusty coating, not a thick paste.
- Heat the olive oil and the first 2 tablespoons (30g) of butter in a large skillet over medium high heat. Wait until the butter foams and the bubbles start to subside.
- Add the chicken in a single layer. Cook for approximately 3 minutes per side until a deep mahogany crust forms and the meat is cooked through. Transfer the chicken to a warm plate.
- Pour the white wine and chicken stock into the hot pan. Use a wooden spoon to scrape the bottom of the pan until all the browned bits are dissolved.
- Add the lemon juice and capers to the pan. Simmer for 2-3 minutes until the liquid reduces by about one third.
- Reduce heat to low and whisk in the remaining 3 tablespoons (45g) of chilled, cubed butter one piece at a time. Swirl the pan constantly until the sauce looks thick and glossy.
- Stir in the fresh parsley. Return the chicken to the pan briefly to coat with sauce or pour the sauce directly over the plated chicken.
Chef's Tip: If you want an even deeper flavor, add a tiny pinch of lemon zest along with the juice. It adds the essential oils from the peel that juice alone just can't provide.
Common Cooking Fixes
Even the best cooks run into trouble sometimes. The most common issue with this dish is usually the sauce consistency or the texture of the chicken coating. If you've ever had a traditional one pot Italian recipe come out too watery, you know the struggle of trying to thicken things up at the last minute without ruining the flavor.
The Sauce is Too Thin
If your sauce looks more like soup than a glaze, you probably didn't reduce the wine and stock enough before adding the butter. You can turn the heat back up and simmer it for another minute, but be careful not to overcook the capers, as they can lose their texture.
The Coating is Soggy
This usually happens if the pan wasn't hot enough or if you crowded the chicken. When you put too many pieces in at once, the temperature of the oil drops, and the chicken starts to steam in its own juices instead of searing.
| Problem | Root Cause | Solution |
|---|---|---|
| Broken Sauce | Heat was too high when adding butter | Remove from heat and whisk in a teaspoon of cold water to bring it back. |
| Breading Falling Off | Chicken was too wet before dredging | Pat the meat completely dry with paper towels before putting it in the flour. |
| Bitter Flavor | Burnt butter or too much lemon pith | Add a tiny pinch of sugar or another tablespoon of butter to mellow the acidity. |
Common Mistakes Checklist
- ✓ Always pat the chicken dry before dredging to ensure the flour sticks properly.
- ✓ Don't skip the "shaking off excess" step - too much flour leads to a gummy, thick coating.
- ✓ Ensure the butter for the sauce is ice cold; warm butter will just melt into oil.
- ✓ Avoid using a non stick pan if you want those flavorful browned bits for your sauce.
- ✓ Don't over reduce the sauce before adding butter, or it might become too salty from the stock.
Flavor Variation Ideas
While the classic version is hard to beat, you can definitely tweak this to fit your family's preferences or whatever you have in the fridge.
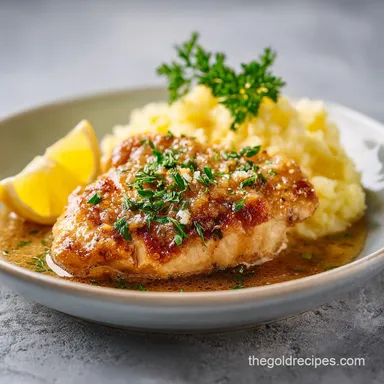
- Chicken Piccata with Pasta: This is the most popular way to serve it. Cook 250g of linguine or angel hair pasta and toss it directly into the pan with the sauce before adding the chicken back.
- The dairy-free Swap: You can use a high-quality plant based butter. Look for one with a high fat content so it still emulsifies correctly. Avoid using just oil at the end, as it won't create that "velvety" texture.
- The "California" Variation: Add some halved cherry tomatoes and a handful of fresh baby spinach to the pan right after you add the wine. It adds a pop of color and some extra nutrients for the kids.
If you are scaling this recipe down for just two people, use a smaller skillet. Using a massive pan for a small amount of sauce will cause the liquid to evaporate too quickly, leaving you with a salty, concentrated mess before you can even get the butter in. When scaling up for a crowd, work in batches for the chicken.
Keep the finished cutlets on a wire rack over a baking sheet in a 90°C (200°F) oven to stay crispy while you finish the rest and make the sauce.
Saving Leftover Portions
This is definitely a dish that is best enjoyed fresh because of that crispy coating, but you can certainly save leftovers for a hearty lunch the next day.
- Storage: Keep leftovers in an airtight container in the fridge for up to 3 days.
- Freezing: I don't recommend freezing the finished dish, as the sauce will likely break (separate) when thawed, and the chicken coating will become very soft. You can, however, freeze the butterflied and pounded raw chicken for up to 3 months.
- Zero Waste: Don't throw away those lemon halves! Toss them into a jar of white vinegar to create a natural citrus cleaner, or use the zest before you juice them to flavor a batch of cookies or muffins later in the week.
To reheat, the best method is in a skillet over medium low heat. Add a tiny splash of chicken stock to the pan to help loosen up the sauce and prevent the chicken from drying out. Avoid the microwave if you can, as it tends to make the chicken rubbery and the sauce oily.
Best Serving Ideas
Because this dish is so bright and acidic, it pairs beautifully with starches that can soak up all that extra sauce. My personal favorite is a simple bed of buttery mashed potatoes or a pile of fluffy jasmine rice.
If you're looking for a lighter option, roasted asparagus or sautéed green beans with a little garlic complement the lemon flavors perfectly.
For the best experience, serve this on warm plates. Since the sauce is an emulsion, it can start to set or separate if it hits a cold ceramic plate. Just running your plates under hot water for a second and drying them off makes a huge difference in keeping the meal "restaurant style" until the very last bite.
This is a meal meant for gathering, so put the skillet right in the middle of the table and let everyone help themselves!

High in Sodium
845 mg 845 mg of sodium (37% 37% of daily value)
The American Heart Association recommends limiting sodium intake to no more than 2,300mg per day.
Tips to Reduce Sodium
-
Reduce Added Salt-25%
Significantly cut down on the 1 tsp kosher salt. Start by using only 1/4 tsp. The capers and chicken stock will still provide some saltiness.
-
Use Low-Sodium Stock-20%
Replace the 1/2 cup low-sodium chicken stock with an even lower sodium or no-salt added version. This is a key source of sodium in the sauce.
-
Rinse Capers Thoroughly-10%
Ensure you thoroughly rinse the 1/4 cup non-pareil capers under cold water before using them. This will help remove excess brine and sodium.
-
Boost Fresh Herbs & Spices
Enhance flavor with plenty of fresh Italian parsley, lemon zest, and other herbs and spices like garlic powder or onion powder. Avoid pre-made spice blends that may contain added salt.
-
Choose Dry Wine Carefully-5%
While most dry white wines are low in sodium, check the label if possible. Some wines can have small amounts of added sulfites that contribute to sodium content.
Recipe FAQs
What's the secret to a great piccata sauce?
Whisk in chilled, cubed butter at the very end. Swirling the cold butter into the reduced liquid creates a stable, velvety emulsion that clings perfectly to the chicken.
What cut of chicken is best for piccata?
Boneless, skinless chicken breasts are the standard. You must butterfly them horizontally and pound them to a uniform 1/4 inch thickness so they cook rapidly and evenly in just 3 minutes per side.
Can a diabetic eat baked chicken?
Yes, this chicken is a high protein, low-carbohydrate option. While this specific recipe is pan-seared rather than baked, the primary ingredients lean breast meat and lemon juice fit well within a controlled carb diet.
What is the most delicious chicken dish in the world?
Flavor is subjective, but many chefs argue that the balance of acidity and richness makes Piccata a top contender. If you enjoy how we balance savory stock with bright lemon juice here, you can apply similar flavor balancing principles to our creamy taco soup recipe.
How to prevent the sauce from becoming too salty?
Avoid over reducing the chicken stock before adding the butter. If you simmer the liquid for too long, the salt content in the stock concentrates, which can ruin the final flavor profile.
How to get a deep mahogany crust on the chicken?
Use a stainless steel skillet over medium high heat. The stainless steel surface allows for better fond development than non-stick pans, providing the essential browned bits needed for a flavorful sauce.
Is it true I should use room temperature butter for the sauce?
No, this is a common misconception. You must use ice-cold, cubed butter to ensure it emulsifies properly into the sauce; room temperature butter will simply melt into oil rather than creating a creamy texture.
Classic Chicken Piccata
Ingredients:
Instructions:
Nutrition Facts:
| Calories | 432 kcal |
|---|---|
| Protein | 36.4 g |
| Fat | 25.1 g |
| Carbs | 7.8 g |
| Fiber | 0.6 g |
| Sugar | 0.9 g |
| Sodium | 845 mg |
